Friday, November 30, 2012

It's Christmas!

Did I mention that I love Christmas?!

It's almost unhealthy... ALMOST. So to celebrate I plan to follow up the Bubble Wreath with Christmas crafts and tutorials for the next three weeks leading up to Christmas.


So starting next week, here are some tid-bits I hope to have for you in the coming weeks:

1. Tips for a beautiful Christmas Tree

2. DIY Advent wreath

3. How to wrap a present

What is your favorite Christmas craft?

Tuesday, November 27, 2012

Bubble Wreath

Who would have guessed that Christmas is my favorite holiday?  I love EVERYTHING about Christmas though...the shopping...the music...the decorations...the TREE...I love Christmas trees. Real Christmas trees. They smell amazing and I am a sucker for ornaments. Opening them up every year is like opening 100 tiny presents. So naturally ever since seeing them on Pinterest, I have loved the idea of 

making a Christmas ornament wreath


Of course, instead of reading one of the thousand sites that have great directions on making these wreaths, I decided that it would be easy to figure out how to do it myself. I hit some snags but I think it turned out okay (shockingly enough).... Here are my directions tips and ideas so you can make one of your very own.

Materials:
18" wire wreath frame (I got mine at Michaels...similar Here)
Plastic Christmas Bulbs (Target)
Scrap string/yarn
Large Needle
Craft Glue (choose on that dries clear)
Large Ribbon (10-12 feet)


DIY Christmas Ornament Wreath Materials

I started by tying my yarn to the wreath then started to string the ornaments onto the yarn. I did three at a time and looped the yarn through the wreath wire. Make sure to evenly vary what ornaments you're stringing so that you will have an even assortment of styles through your whole wreath. Pull the string until its taught (not so tight that the ornaments start popping off though). Even doing this, the ornaments will be a bit floppy but that's okay we'll fix that later.

DIY Christmas Ornament Wreath

Once all the ornaments are on the wreath, you'll notice that there is still an exposed bit of wire on the wreath but that's OKAY! Lay the wreath on a flat surface and finagle the ornaments so that they are to the sides of the wreath, not behind it (you want the wire back of the wreath to rest flat on your work surface). The string should generally be holding the ornaments in place but they are still movable if you want to switch one ball with an adjacent one. Once you are happy with how the ornaments are arranged, take some craft glue and put a glob between every single touching ornament. Leave the wreath overnight to dry.

Once everything is dry you should be able to pick up your wreath without any of the ornaments moving. Now you just need the bow! Get your big ribbon and unroll the full length and find the center and fold your ribbon in half. now figure out how long you want ribbon to hang. Mine hangs from above the window on my front door to just below it (See image below). once you find the appropriate length, tie a knot, Then make a big bow (You can do this by repeatedly doing the "bunny ears" version of tying shoes). Once you have a big bow with a few feet left of ribbon on each side, tie the bow to the exposed wire part of the wreath. this should hide any wire. Loop the remaining loose ribbon through any large gaps between the ornaments and VOILA you're done!

DIY Christmas Ornament Wreath

Tips and notes:

These directions were for my wreath but if I had it to do over I would change a few things. So I thought I would make some suggestions for making you're weather even better:
  • Buy some smaller balls to mix with the big ones. That will help fill in those pesky gaps that you cant hide. It will also help fill up the wreath so you don't need a big bow to hide the top of the wreath when you run out of ornaments.
  • Buy PLASTIC ornaments. I know I already said this above, and I did happen to buy plastic ones but I considered glass ones. I guarantee I would have broken them ALL when trying to make the wreath and even if by some miracle they had made it through the construction process unscathed, I would be breaking one every time I shut the door and the wreath bounces against it. 
  • Try some COLORS. I did all gold because I'm married and my husbands a lame wad, but you're not married to my husband so presumably you have no such restrictions. be colorful!

Wednesday, November 21, 2012

Brittany Scarf


Do you remember the scarf/hood I talked about knitting for my sister last year for Christmas? Of course you don't, it was LAST YEAR! Since I'm bringing it up you might think that maybe I am finally going to post come completed pictures of it...sadly no, I was so burnt out by the time I completed the scarf I didn't bother taking any, but I did run across some "in progress" photos that I that I should share. And hopefully I will catch my sister wearing it this Christmas and I can snap a few completed shots.


Colorful Knit Scarf
 Did I mention that this scarf has POCKETS? That's why you see the pattern on both the front and back of the scarf. I knitted on one side for a bit and then switched sides (my front became my back and my back became my front) so I could fold over the end and stitch up the sides to make a pocket.

Colorful Knit Scarf


Yarn Used: Malabrigo Rios Yarn    NS:6-8
Color: ARCOIRIS Arco Iris
Skeins Used: 5
Note: Dye lots vary GREATLY to the point of looking like a different color blend so it's better to get too much yarn and return some than have to little and have to buy one skein from a different dye lot.

I have not included the hood pattern but here is the scarf pattern with and without pockets:

Abbriviations:


RC-P = Slip 1 to back, K4 then P1 from Cable needle
LC-P = Slip 4 to front, P1 then K4 from Cable needle

Moss =                 Even Rows: K1 P1 across the row
                Odd Rows: Knit the purls and purl the knits
(If you started with K1 on the front side, you will start with K1 on the back side as well)
Stockinette: K on front side, P on back side


Pattern:
Cast on 40 stitches
Moss for 6 rows

A. 5 moss, P4, K1, P7, K6, P7, K1, P4, 5 moss
B. 5 moss, K4, P1, K7,P6, K7, P1, K4, 5 moss

1.   5 moss, P4, K1, P6, RC-P, LC-P, P6, K1, P4, 5 moss
2.   5 moss, K4, P1, K6, P3, K2, P3, K6, P1, K4, 5 moss
3.   5 moss, P4, K1, P5, RC-P, P2, LC-P, P5, K1, P4, 5 moss
4.   5 moss, K4, P1, K5, P3, K4, P3, K5, P1, K4, 5 moss
5.   5 moss, P4, K1, P4, RC-P, P4, LC-P, P4, K1, P4, 5 moss
6.   5 moss, K4, P1, K4, P3, K6, P3, K5, P1, K4, 5 moss
7.   5 moss, P4, K1, P3, RC-P, P6, LC-P, P3, K1, P4, 5 moss
8.   5 moss, K4, P1, K3, P3, K8, P3, K3, P1, K4, 5 moss
9.   5 moss, P4, K1, P3, LC-P, P6, RC-P, P3, K1, P4, 5 moss
10. 5 moss, K4, P1, K4, P3, K6, P3, K4, P1, K4, 5 moss
11. 5 moss, P4, K1, P4, LC-P, P4, RC-P, P4, K1, P4, 5 moss
12. 5 moss, K4, P1, K5, P3, K4, P3, K5, P1, K4, 5 moss
13. 5 moss, P4, K1, P5, LC-P, P2, RC-P, P5, K1, P4, 5 moss
14. 5 moss, K4, P1, K6, P3, K2, P3, K6, P1, K4, 5 moss
15. 5 moss, P4, K1, P6, LC-P, RC-P, P6, K1, P4, 5 moss
16. 5 moss, K4, P1, K7, P6, K7, P1, K4, 5 moss

Without Pockets:
Repeat rows 1-16 until you reach desired length. Moss 6 rows and cast off. 

With Pockets.
Repeat rows 1-16 two times. Then knit a reverse stockinette stitch for 4 rows. Then knit a regular stockinette stitch until you can fold your stockinette panel over and have it reach the moss stitches you did to start your scarf (about 7"). Now your going to flip sides, your front will become your back and your back will become your front. All this means is that you knit an odd number of rows on your stockinette stitch (so you end with a K row). Then you begin the pattern again from just after the moss rows. Repeat rows 1-16 until the scarf is the length that you want. (include the unfolded pocket in your length assessment because you still have to knit the back of the second pocket).
Once you are happy with the scarf length, flip sides again and begin a stockinette stitch. You will be beginning on the back side of the stitch (i.e. you will start with your P row). Knit until the length of the stockinette matches the stockinette stitch on the other end of the scarf. Knit 4 rows in reverse stockinette stitches and knit rows 1-16 three times, Knit rows A & B, moss 6 rows and cast off.
Fold over each pocket at the reverse stockinette stitches and stitch the sides with an extra length of yarn.


Wednesday, November 7, 2012

Blazer Bling

I have some great knitting projects that I am SO excited to share but they are Christmas presents so unfortunately I am going to have to wait until after the new year to post them. In the mean time, here is a little crafty project I came up with a little while back....

For months I have been eying those fancy blazers with the snazzy sleeve lining that you can show off by folding over the cuffs. I looked around but just couldn't find what I was looking for in my price range. So, on a whim, I decided to update one of my old blazers and satiate my need for a fun cuff.

I couldn't find the striped fabric that I was looking for so I opted for some zebra print and gold buttons....

Before:


 After:
Jacket Cuffs


I brought the blazer with me to the fabric store so I could find properly sized buttons and switch them out (without having to make any changes to the button holes). Then I just sewed the zebra print into the sleeves (on top the the existing lining) and VOILA! In just a couple hours, a fresh look for an old blazer.

Thursday, November 1, 2012

Spring Sweater (Part 2)

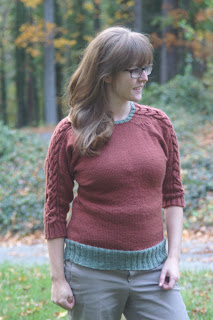
As promised...here is my finished sweater and just in time for winter....


I am not entirely happy with the finished product. In a perfect world I would tear out the top half and make it wider so I could have the droopy sleeves that I had envisioned for the sweater and I also WILL need to re-knit the neck as the cast off was waaaay too tight. In the mean time though, here is a good look at my first sweater attempt and as well as a lesson in why patterns might not be such a bad idea after all....

Yarn Used: Mission Falls 136 Merino Superwash
Color: 009 (Red) & 019 (Green)

I have completely lost track of the number of skeins used... maybe 10 at 136 yards each?

The good news is the holiday season is rolling around again and I am confident that I will do much better documentation of my holiday knit gifts than I did last year.(although some of them may not make their debut on this blog until after the new years for obvious reasons)  I have also come up with a new pattern for one project that I am very pleased with so far!