Showing posts with label knitting pattern. Show all posts

Wednesday, June 10, 2015

Ballon-mobile


Contrary to what you might have in mind, this is not a vehicle made of balloons. Oddly enough it is a baby knitting project! During my 2 ways post due down time, in an attempt to maintain my sanity I came up with a pattern to create a mobile out of knitted balloons. This is a super quick and easy project

TOOLS

size US 2 DPN's
embroidery hoop
4 colors of sport weight yarn
poly stuffing

BALLOON PATTERN

Cast on 9 stitches using the long tail method and making sure to leave at least a 6" tail
Join stitches to knit in a round (add a stitch marker)
R1: K
R2: K1, K2tog to end of row
R3: K2tog
R4: K1, M1 (add a maker after each newly created stitch)
R5-12: K until makers and M1 at each stitch marker
You should have a total of 30 stitches at this point
R13: K
R14-23: K until markers and M1 at each stitch marker
You should have a total of 60 stitches at this point
R24-29: K
R30-33: K to markers and K2 tog
R34: Knit 3, K2tog (add maker)
R35- end K until you have 2 stitches left before your marker and K2tog
Once you are down to 3 stitches cut a long tail of yarn and run it through your stitches.
Use stuffing to fill the balloon. (I suggest using small bits of stuffing and shaping the balloon throughout the process to make sure it's nice and round)
Once the balloon is filled, pull the yarn tight to close up the hole.
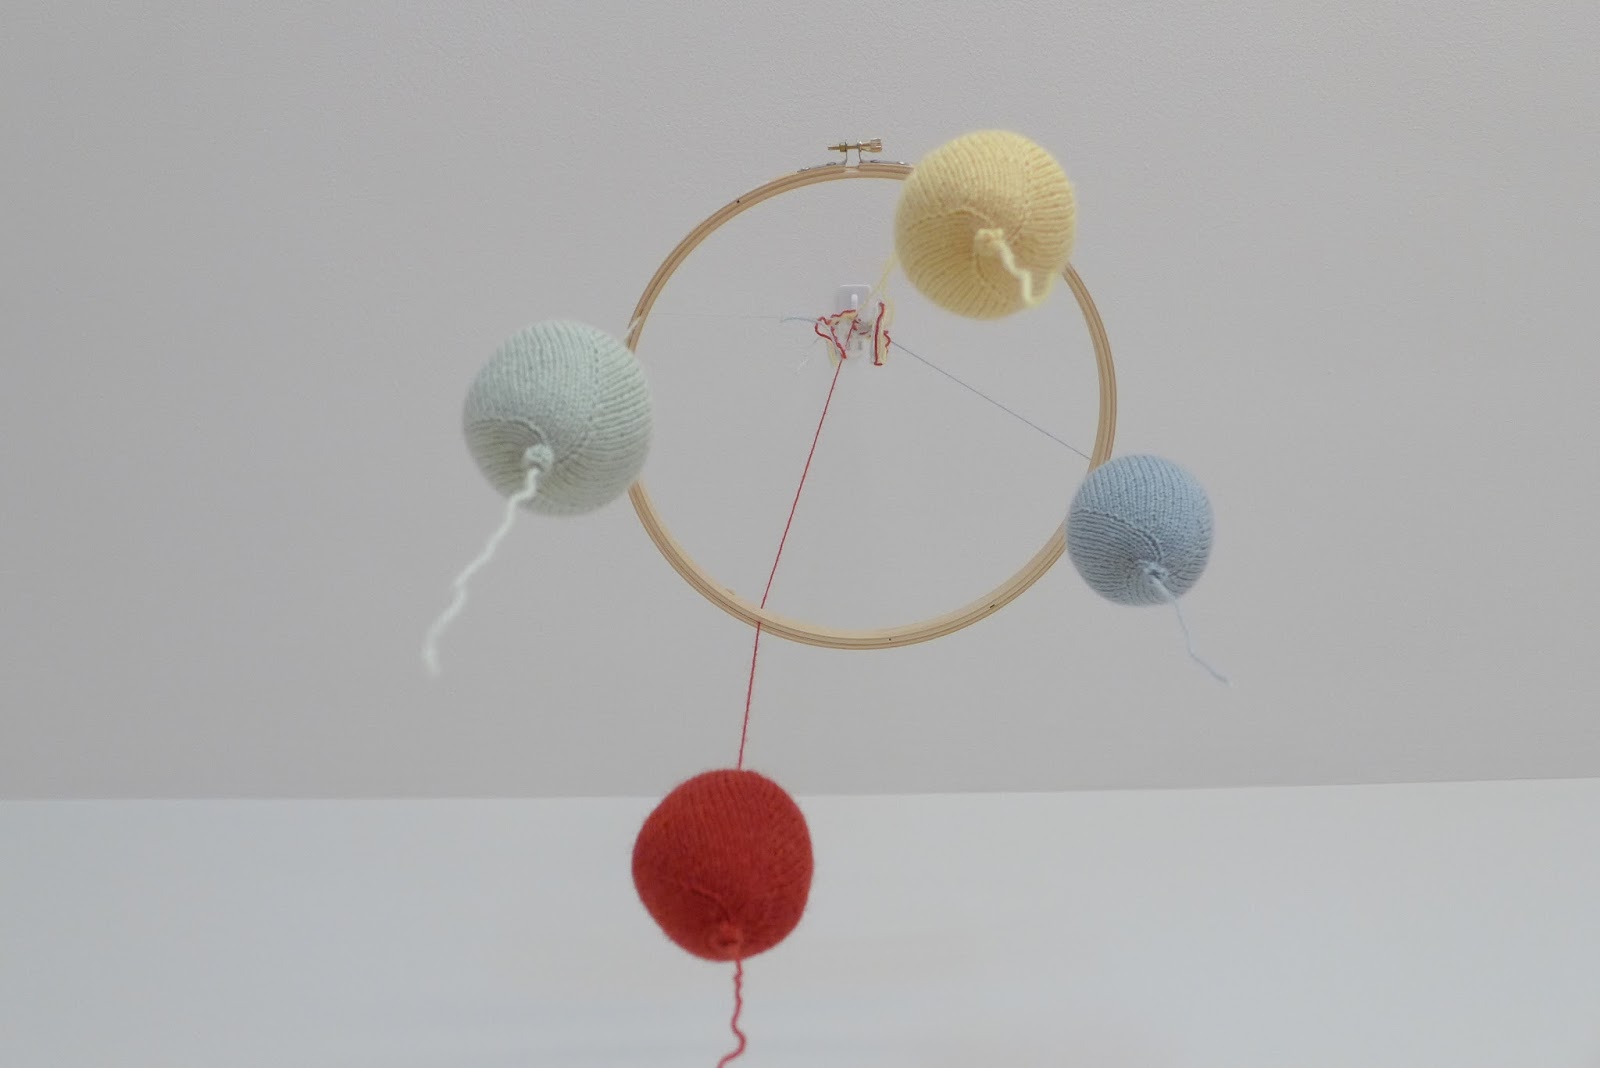
MOBILE ASSEMBLY

Once you have created 4 balloons, drape them evenly spaced around the inside ring of your embroidery hoop making sure that each balloon is hanging at the desired length. (if you are having trouble you can use a small piece of tape to secure each balloon string where you want it). Place the outside ring onto the hoop and close it up. Take all four balloon tails and tie them together so that the hoop hangs level. Cut off your excess and you're all set to hang your new mobile!


Tuesday, September 16, 2014

Michael Scarf

My Christmas knitting exploits are well on their way and among them is the Michael scarf.


Materials:

Berroco Ultra Alpaca Chunky, 6 skeins (750 yards)
shown in color 7206 Light Gray
1 set US #11 Needles (As you can see, I used a magic loop and just knit back and forth on it)
Cabling needle

Cast on 40 stitches using your preferred cast on method (I prefer the long tail method).
To create the ripping K2, P2 for 16 rows.

After 16 rows (or once you have the ribbing to the desired length finishing at an even row), begin pattern as shown below:

Round 1   [fs]: P1, K6, P1, K4, P1, K7, P1, K7, P1, K4, P1, K6, P1
Round 2   [bs]: K1, P6, K1, P4, K1, P6, K1, P1, K1, P6, K1, P4, K1, P6, K1
Round 3   [fs]: P1, C6F, P6, K5, P1, K1, P1, K1, P1, K5, P6, C6B, P1
Round 4   [bs]: K1, P6, K6, P4, K1, P1, K1, P1, K1, P1, K1, P4, K6, P6, K1
Round 5   [fs]: P1, K6, P1, K4, P1, K3, P1, K1, P1, K3, P1, K1, P1, K3, P1, K4, P1, K6, P1
Round 6   [bs]: K1, P6, K1, K1, P4, K1, P2, K1, P1, K1, P5, K1, P1, K1, P2, K1, P4, K1, P6, K1
Round 7   [fs]: P1, K6, P6, K1, P1, K1 P1, K7, P1, K1, P1, K1, P6, K6, P1
Round 8   [bs]: K1, P6, K6, P2, K1, P1, K1, P5, K1, P1, K1, P2, K6, P6, K1
Round 9   [fs]: P1, C6F, P1, K4, P1, K3, P1, K1, P1, K3, P1, K1, P1, K3, P1, K4, P1, C6B, P1
Round 10 [bs]: K1, P6, K1, P4, K1, P4, K1, P1, K1, P1, K1, P1, K1, P4, K1, P4, K1, P6, K1
Round 11 [fs]: P1, K6, P6, K5, P1, K1, P1, K1, P1, K5, P6, K6, P1
Round 12 [bs]: K1, P6, K6, P6, K1, P1, K1, P6, K6, P6, K1 

Repeat rounds 1-12 until scarf is the desired length. K2, P2 for 16 rows (or an equivalent number of rows to what you did in the beginning) and cast off loosely.

Be sure to block the scarf or it will not lie flat.

Saturday, September 13, 2014

Vicki Fingerless Gloves


I recently rediscovered this pattern I came up with a couple of years ago for fingler-less gloves. It looks like I got 90% complete but forgot to write up knitting off the three fingers and the knitting of the thumb. I hate to post an incomplete pattern but I also hate to see this lovely option go to waste. If anyone is daring enough to give this pattern a shot and complete the missing parts, I would love to see it!


Materials:
blue sky alpaca silk, 1 skein (146 yards)
shown in color 138 
1 set US #2 (2.72mm) DPNs
Stitch Markers
Tapestry needle
Cabling needle

Size:
Ladies' small/medium

Pattern:
Left Glove
Cast on 54 stitches, divided between 3 needles
*KTB1, P1, repeat from * around.
Repeat for 11 more rows

Add one stitch and and begin the lase panel as follows:

Round 1: K6, P2, K4, P2, K2, P2, (K2tog, K1, YO, K1, YO, K1, S1, K1, PSSO,) P2, K2, P2, K4, P2, K to end of rnd.

Round 2: K6, P2, K4, P2, K2, P2, K7, P2, K2, P2, K4, P2, K to end of rnd.

Round 3: K6, P2, C4B, P2, K2, P2, (  K2tog, YO, K3, YO, S1,  K1, PSSO,) P2, K2, P2, C4F, P2, K to end of rnd.

Round 4: as rnd 2

Round 5: K6, P2, K4, P2, K2, P2, (K1, YO, S1, K1, PSSO, K1, K2tog, YO, K1,) P2, K2, P2, K4, P2, K to end of rnd.

Round 6: as rnd 2

Round 7: K6, P2, C4B, P2, K2, P2, (K2, YO, S1, K2tog, PSSO, YO, K2), P2, K2, P2, C4F, P2, K to end of rnd.

Round 8: as rnd 2

Repeat Rounds 1-8 and begin thumb gusset adding 1 stitch on each side of the thumb gusset (starting at the first stitch and 3rd from the end leaving two stitches in the middle of the gasset). Continue to add stitches on the 1st and 4th row of pattern util gusset consists of 14 stitches. Knit through to round 8 stopping at the thumb gusset marker. Slip 14 gusset sts to stich holder or length of waste yarn. Cast on 2 stitches, work to end of rnd (55 sts)

Without individual fingers: Repeat Rounds 1-8 twice more and work 6 rounds of KBT1, P1 ribbing. Bind off loosely. 


With individual fingers: Repeat rounds 1-8  1-1/2 more times stopping on round 4: 8 stitches after the Pattern (K6, P2, K4, P2, K2, P2, K7, P2, K2, P2, K4, P2, K8). 

Pinky: Slip all stitches except the last 14 stitches you just knitted onto a stitch holder or length of waste yarn.
Add two stitches, K three rounds and then work 3 rounds of KBT1, P1 ribbing. Bind of Loosely

Remaining fingers: Transfer remaining stitches back onto three needles. Pick up and knit 3 stitches between pinky and ring finger. knit to end of round. Work modified rows 5-8 as shown below (basically you don't have the final cable or pearls because they are on the pinky)

Round 5: K6, P2, K4, P2, K2, P2, (K1, YO, S1, K1, PSSO, K1, K2tog, YO, K1,) P2, K2, P2, K to end of rnd.

Round 6: K6, P2, K4, P2, K2, P2, K7, P2, K2, P2, K to end of rnd.

Round 7: K6, P2, C4B, P2, K2, P2, (K2, YO, S1, K2tog, PSSO, YO, K2, P2, K2,) P2, K to end of rnd.

Round 8: as rnd 6

...Here is where the pattern dropped off... Now it's up to you to fill in the blanks!

Wednesday, November 21, 2012

Brittany Scarf


Do you remember the scarf/hood I talked about knitting for my sister last year for Christmas? Of course you don't, it was LAST YEAR! Since I'm bringing it up you might think that maybe I am finally going to post come completed pictures of it...sadly no, I was so burnt out by the time I completed the scarf I didn't bother taking any, but I did run across some "in progress" photos that I that I should share. And hopefully I will catch my sister wearing it this Christmas and I can snap a few completed shots.


Colorful Knit Scarf
 Did I mention that this scarf has POCKETS? That's why you see the pattern on both the front and back of the scarf. I knitted on one side for a bit and then switched sides (my front became my back and my back became my front) so I could fold over the end and stitch up the sides to make a pocket.

Colorful Knit Scarf


Yarn Used: Malabrigo Rios Yarn    NS:6-8
Color: ARCOIRIS Arco Iris
Skeins Used: 5
Note: Dye lots vary GREATLY to the point of looking like a different color blend so it's better to get too much yarn and return some than have to little and have to buy one skein from a different dye lot.

I have not included the hood pattern but here is the scarf pattern with and without pockets:

Abbriviations:


RC-P = Slip 1 to back, K4 then P1 from Cable needle
LC-P = Slip 4 to front, P1 then K4 from Cable needle

Moss =                 Even Rows: K1 P1 across the row
                Odd Rows: Knit the purls and purl the knits
(If you started with K1 on the front side, you will start with K1 on the back side as well)
Stockinette: K on front side, P on back side


Pattern:
Cast on 40 stitches
Moss for 6 rows

A. 5 moss, P4, K1, P7, K6, P7, K1, P4, 5 moss
B. 5 moss, K4, P1, K7,P6, K7, P1, K4, 5 moss

1.   5 moss, P4, K1, P6, RC-P, LC-P, P6, K1, P4, 5 moss
2.   5 moss, K4, P1, K6, P3, K2, P3, K6, P1, K4, 5 moss
3.   5 moss, P4, K1, P5, RC-P, P2, LC-P, P5, K1, P4, 5 moss
4.   5 moss, K4, P1, K5, P3, K4, P3, K5, P1, K4, 5 moss
5.   5 moss, P4, K1, P4, RC-P, P4, LC-P, P4, K1, P4, 5 moss
6.   5 moss, K4, P1, K4, P3, K6, P3, K5, P1, K4, 5 moss
7.   5 moss, P4, K1, P3, RC-P, P6, LC-P, P3, K1, P4, 5 moss
8.   5 moss, K4, P1, K3, P3, K8, P3, K3, P1, K4, 5 moss
9.   5 moss, P4, K1, P3, LC-P, P6, RC-P, P3, K1, P4, 5 moss
10. 5 moss, K4, P1, K4, P3, K6, P3, K4, P1, K4, 5 moss
11. 5 moss, P4, K1, P4, LC-P, P4, RC-P, P4, K1, P4, 5 moss
12. 5 moss, K4, P1, K5, P3, K4, P3, K5, P1, K4, 5 moss
13. 5 moss, P4, K1, P5, LC-P, P2, RC-P, P5, K1, P4, 5 moss
14. 5 moss, K4, P1, K6, P3, K2, P3, K6, P1, K4, 5 moss
15. 5 moss, P4, K1, P6, LC-P, RC-P, P6, K1, P4, 5 moss
16. 5 moss, K4, P1, K7, P6, K7, P1, K4, 5 moss

Without Pockets:
Repeat rows 1-16 until you reach desired length. Moss 6 rows and cast off. 

With Pockets.
Repeat rows 1-16 two times. Then knit a reverse stockinette stitch for 4 rows. Then knit a regular stockinette stitch until you can fold your stockinette panel over and have it reach the moss stitches you did to start your scarf (about 7"). Now your going to flip sides, your front will become your back and your back will become your front. All this means is that you knit an odd number of rows on your stockinette stitch (so you end with a K row). Then you begin the pattern again from just after the moss rows. Repeat rows 1-16 until the scarf is the length that you want. (include the unfolded pocket in your length assessment because you still have to knit the back of the second pocket).
Once you are happy with the scarf length, flip sides again and begin a stockinette stitch. You will be beginning on the back side of the stitch (i.e. you will start with your P row). Knit until the length of the stockinette matches the stockinette stitch on the other end of the scarf. Knit 4 rows in reverse stockinette stitches and knit rows 1-16 three times, Knit rows A & B, moss 6 rows and cast off.
Fold over each pocket at the reverse stockinette stitches and stitch the sides with an extra length of yarn.


Wednesday, October 31, 2012

Gingerbread Hat


I have finished my sweater! I know...that photo above is not a picture of a sweater. I will blame Sandy (the hurricane) for making poor photography conditions so I don't have any pictures yet but  they are coming!  In the mean time, I had a friend request a new hat so here is a Gingerbread Hat that I completed last week.

Knit Gingerbread Hat

Knit Gingerbread Hat


I don't normally follow patterns but I decided to give it a try. I made the brim a few stitches longer than the directions called for but otherwise I followed the pattern. I used the largest hat size the pattern offered and despite being doubtful about sizing and the top closure while I was knitting, I am very happy with the results. It was a great quick knitting project.

Revelry offers the pattern for free [here] 

Yarn Used: malabrigo Worsted 100% Merino Wool  NS: US 7-9(knit with a size 8)
Color: 52 Paris Night

The skein was about 210 Yards and I didn't even come close to using the whole thing.

Thursday, October 20, 2011

Missin' Mission Neck Warmer

I realized that it's somewhat strange that my first crafting article on a knitting focused blog was not about knitting. So, I thought I'd follow up with a recently completed knitting project of mine; a neck warmer in my favorite brand of yard, mission falls, which I am sad to say, recently went out business. (I do have plans to take advantage of this unfortunate news however, and stock up on yarn at closeout prices.) This was my first pursuit into the world of cables and I must say I was delighted to find that this was not nearly as complicated as I had initially anticipated.

Knit Neck Warmer

Knit neck Warmer

Sadly, I cant remember the exact pattern I came up with for the scarf but I'll tell you what I can remember:

Materials: 2 Skeins Mission Falls 136 Merino Superwash (color 022)
                One colorful button
The edges and ends are a moss stitch and I used three eight-stitch cables with three or four garter stitches between them.

I am writing the pattern from memory so I could be a bit off, but this should get you close:

Stitches used:
moss stitch
garter stitch
eight-stitch cable

Cast on 53 stitches
Row 1-12: moss stitch row
Row 13: K1,*P1, K1 repeat from * 8 sts, K3, C8F, K4, C8F, K4, C8F, K4, P1,*K1,P1, repeat from * 8 sts
Row 14: K1,*P1, K1 repeat from * 8 sts, K3, P8, K4, P8, K4, P8, K4, P1,*K1,P1, repeat from * 8 sts
Row 15: K1,*P1, K1 repeat from * 8 sts, K35, P1,*K1,P1, repeat from * 8 sts
Row 16-17: Repeat rows 10 & 11
Repeat rows 13-17 as many times as necessary until the scarf is about 24"-26" long and then add a button hole. There are a number of videos online that can help you if you don't know how to add a button hole. Make sure to size the hole for whatever button you plan to add at the end.
I located my button hole just inside the moss stitches on the edge but it can really be located anywhere between moss stitch edging.
Once the button hole is added, repeat rows 13-17 four or five more times and then finish the neck warmer by repeating rows 1-8 and bind off.

Sew on your button with an extra bit of yarn and you're all set to enjoy your new neck warmer!